Tuesday, July 19, 2011

Strawberry Rhubarb Turnovers

We were heading to a friends place for dinner and I said I'd bring a simple dessert. With so many strawberries, and some rhubarb left over, I decided to make some turnovers. These were great out of the oven, in the morning for breakfast, and of course after a great dinner with friends.

Strawberry Rhubarb Turnovers
- 1 package frozen puff pastry, thawed
- 1 egg, lightly beaten
- 2 cups diced strawberries
- 1 3/4 cups diced rhubarb
- 1 teaspoon balsamic vinegar
- 1/2 cup sugar
- 1/4 cup cornstarch

Mix the strawberries, rhubarb, vinegar, sugar and cornstarch together in a bowl.

Roll out each square of puff pastry to a 12x12 inch square. Cut each piece into 4 (for 8 total). Brush edges with egg. Using a slotted spoon (to avoid excess liquid) spoon mixture onto half of each square. Fold over to create triangle, crimping edges with a fork. Make three slits on top with sharp knife. Brush with egg and sprinkle with sugar (coarse sugar if you have it).

Arrange on parchment lined baking sheet and bake in 400 degree oven until golden and puffy (about 15 - 20 minutes).

Monday, July 11, 2011

Strawberries

The fresh strawberries have been out in full force at the Markets for a few weeks now, and after hearing on the radio that the U-Pick season was wrapping up, I rallied the troops and we headed out to Farm country Saturday for some berry picking at Driediger Farms. I'm not really that good at estimating how much I have, so when we went to pay, turns out we'd picked 12 lbs of berries!

With that many strawberries I decided I would be making two batches of jam, and since the farm had some fresh rhubarb, the decision was easy. One batch of strawberry jam and one batch of strawberry-rhubarb. Now I can't decide which I like better!

Still, we had a ton of strawberries left, so I needed to freeze some of them. The best way to freeze them is to place on a cookie sheet in a single layer, in the freezer for at least 5 hours, then bag them. That way when you go to grab some, they are not all clumped together.

Now for the raspberries...that's next weekend!

Thursday, July 7, 2011

Bulgur and Mushroom Burgers


While these burgers do take a bit of time to prepare,they are another great alternative to beef burgers. For those vegetarians at your next BBQ, these are a nice treat.

Bulgur & Mushroom Burgers (courtesy of Canadian Living)
  • 3/4 cup bulgur
  • 1 egg, beaten
  • 1 cup fresh bread crumbs
  • 1/4 minced fresh parsley
  • 8 oz mushrooms
  • 2 tbsp extra-virgin olive oil
  • 1 small onion, finely chopped
  • 2 cloves garlic, minced
  • 1/4 cup dry white wine
  • 1/2 tsp salt
  • 1/4 tsp pepper
  • 1/4 tsp dried thyme
In heatproof bowl, pour 1 cup boiling water over bulgur; let stand until doubled in bulk, about 20 minutes. Mix in egg, bread crumbs and parsley.

Meanwhile, roughly break mushrooms into pieces and pulse in food processor until finely chopped.
In skillet, heat oil over medium heat; fry onion and garlic until softened, about 3 minutes. Stir in mushrooms, wine, salt, pepper and thyme. Cook over medium heat, stirring occasionally, until liquid is evaporated and mushrooms begin to brown, about 8 minutes.
Mix into bulgur mixture. Now here you can shape in four patties, or as I did, make a bunch of mini burgers for sliders.

Grill on greased grill over medium heat, turning once until heated through and crispy, about 15 minutes. We topped ours simply, with bread and butter pickles, ketchup and mustard.

Sunday, June 26, 2011

Sunday Night Dinner - Market Ribs

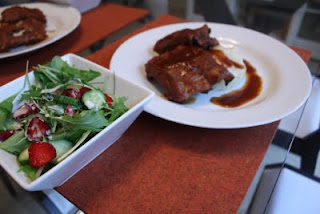
What a full weekend! We hit up the new North Shore Green Market Friday night at the Shipbuilders Plaza before going to see Super 8. Saturday was work, a friends film preview, and watching Teen Wolf on TV while bbq'ing some steaks. Today was a whirlwind, highlights included a hike at Lynn Canyon Park, and dinner, put together from Farmer's Market finds. We had ribs courtesy of Gelderman Farms, picked up at the Main Street Market on Wednesday, mashed potatoes with new potatoes, and an awesome salad with fresh cucumbers, strawberries, and fabulous microgreens found on Friday night.

For the ribs we went with a super easy recipe, adapted from one of Michael Smith's. One of my favourite things about Michael Smith's recipes is the disclaimer:

A recipe is merely words on paper; a guideline, a starting point from which to improvise. It cannot pretend to replace the practiced hand and telling glance of a watchful cook. For that reason feel free to stir your own ideas into this dish. When you cook it once, it becomes yours, so personalize it a bit. Add more of an ingredient you like or less of something you don't like, try substituting one ingredient for another. Remember words have no flavour; you have to add your own!

Such good advice!

Oven-Baked Ribs
- 1 or 2 racks of pork baby back ribs
- 1 can tomato paste
- 1 cup orange juice
- 1 cup brown sugar
- 1/4 cup dijon mustard
- 1/2 cup red wine vinegar
- 1/4 cup Worcestershire sauce
- 1/4 cup Tamari
- 2 heaping tbsp's chili powder

Cut ribs into 2-3 rib portions. Place in large roasting pan. Whisk together all ingredients and pour over ribs. Cover with foil and bake until ribs are tender, about 2 hours.


Tuesday, June 21, 2011

Nanaimo Bars

Now, I wasn't always a huge fan of Nanaimo Bars. I used to find them too rich, and a little artificial. However, once I started making them myself, that all changed. I've made a few different recipes, and they are usually pretty similar.

A couple of things I've noted over the years:
1 - make sure to take the butter out of the microwave right after you've melted it, or you might forget to add it!
2 - do not under any circumstance attempt to make these with margarine, the consistency is not the same.

These ones are courtesy of Canadian Living, and are fantastic. I cut them into bite-sized pieces for a party, although it's hard to eat just one!

Classic Nanaimo Bars
Base:
- 1 cup butter, melted
- 2/3 cup cocoa powder
- 1/2 cup granulated sugar
- 2 eggs, lightly beaten
- 3 cups graham cracker crumbs
- 2 cups shredded coconut
- 1 cup finely chopped walnuts

Filling:
- 1/3 cup butter, melted
- 1/4 cup milk
- 2 tsp vanilla
- 4 cups icing sugar
*I also added 2 tbsp custard powder

Topping:
- 8 oz semisweet chocolate
- 2 tbsp butter

Grease 13x9 inch metal cake pan and line with parchment paper, leaving 1 inch extending over long edges for handles.

In large bowl, whisk together butter, cocoa powder, sugar and eggs; stir in cracker crumbs, coconut and walnuts. Press evenly into prepared pan. Bake in centre of 350˚F oven for 10 minutes. Let cool in pan on rack.
Filling: In large bowl, stir together butter, milk and vanilla; beat in sugar until thickened and smooth. Spread evenly over cooled base. Refrigerate for about 45 minutes or until firm.
Topping: Chop chocolate; in heatproof bowl over saucepan of hot (not boiling) water, melt chocolate and butter. Spread evenly over filling. Refrigerate until set. Using parchment paper handles, lift out of pan. Peel off paper and cut into bars.

Sunday, June 19, 2011

The new kitchen

Here are a couple of pics of the new kitchen. Love it!!!


Kitchen Gadget

I've come across a lot of kitchen gadgets in the past few years. Some are great, others are destined for the recycling bin. This herb chopper is one that not only do I love, but have now also purchased as gifts for friends.

I know chopping herbs isn't the hardest thing on the planet, but if it were so easy why are there numerous special tools to help with it? The reason I love this one is that it chops everything evenly and quickly without bruising. It also has a great little part on the handle that can be used to pull rosemary and thyme through, pulling each of the leaves off.


It's the Fresh Herb Pro, and I received mine as a gift. I have seen them in cooking stores, Sears etc., and I believe it retails around $15-$20. Definitely worth the investment!