Monday, November 1, 2010

Pumpkin Gnocchi

It seems like the theme these days is pumpkin, and I'm okwith that. This is the first time I'd ever roasted a pumpkin and made a puree for cooking with. I have a couple of cups of puree left in the freezer that I'm going to use for some ravioli or soup.

This recipe was from the October issue of Canadian Living. I grew up reading
Canadian Living and my mom bought me a subscription a few years ago, and keeps renewing it for me. One of the best gifts ever! I look forward to every issue, and cannot think of a recipe I've tried from the magazines or cookbooks that hasn't been successful. This was easy to make, and so good! The pumpkin puree can be used for all sorts of things.

I didn't realize that you don't use Jack-O-Lantern pumpkins, but rather sugar pumpkins to cook with. You could use squash in place of this as well.

Pumpkin Puree
Halve and seed pumpkin or squash (keep the seeds for roasting!). Prick skin all over with fork. Roast, cut side down, on rack on foil-lined baking sheet in 350 oven for about an hour, until flesh is browned and tender. Let cool then scoop into a food processor, puree. Refrigerate for up to 48 hours or freeze for up to 3 weeks.

Pumpkin Gnocchi
- 2 cups roasted pumpkin or squash puree
- 1/2 cup finely grated Parmigiano Reggiano
- 1 egg
- 1 tsp salt
- 1/4 tsp freshly grated nutmeg
- 3 cups (approx.) all-purpose flour

Sauce
- 1/3 cup butter
- 1/4 cup pine nuts
- 12 fresh sage leaves

To make Gnocchi: In large bowl, whisk together pumpkin puree, cheese, egg, salt and nutmeg. Using wooden spoon, stir in 2 cups of flour. Stir in remaining flour, 1/4 cup at a time to make a soft, sticky dough.

On well-floured surface with floured hands, roll dough into log; divide into quarters. Take each piece and gently roll and shape into 3/4 inch diameter rope. With sharp knife, cut each rope diagonally into 3/4 inch pieces.

In large pot of boiling salted water, cook gnocchi in 2 batches, stirring gently until it floats to the top, about 3 minutes. Transfer to warm serving dish with slotted spoon.

Meanwhile, in large skillet, melt butter over medium heat. Cook pine nuts until fragrant, and butter begins to brown, about 2 minutes. Add sage leaves and cook until fragrant (less than a minute). Scrape over gnocchi and serve. Deelish!


Tuesday, October 26, 2010

Pumpkin Cheesecake

Thanksgiving was coming up and I wanted to make a dessert that went well with the meal, but that was a bit different. A few years ago I made a Pumpkin Creme Brulee, and it was awesome! So I embarked on a Pumpkin Cheesecake. Now, I had never made a cheesecake before, so was definitely a little apprehensive. It didn't help that the night before we were hosting dinner I decided to make the cheesecake, started to get the ingredients out, and then couldn't find a spring form pan. I swore I had one, but apparently I didn't. So off on the hunt I went, to every grocery store, dollar store, and home store I could find in myneighborhood. I even went so far as to go into a diner and ask if they had one they could lend me. Inthe end I found one in a dollar store after having gone in twice already, I just had to check one last time! It worked out well, because Brent had done the dishes from my Cheesy Carrot Casserole Prep while I was out.
This dessert does take some time, but is definitely worth it, and a great end to any holiday dinner.


Pumpkin Cheesecake (from Best of Bridge)

Crust:
- 2 cups crushed ginger snaps
- 5 tbsp butter, melted
- 2 tsp cinnamon
- 4 tbsp brown sugar

Filling:
- 4 - 8oz. pkgs cream cheese, softened
- 1 1/2 cup sugar
- 5 eggs
- 1/4 cup flour
- 1/2 tsp each ginger, cinnamon & freshly grated nutmeg (so much better than the powder)
- 14 oz can of pumpkin (not the pumpkin pie filling!)
- 2 tbsp maple syrup

CRUST: Combine ingredients. Lightly grease a 13" springform pan and line bottom with crumb mixture. Pat firm and chill.

FILLING: Preheat oven to 325F (160C). Beat softened cream cheese until fluffy. Slowly beat in sugar. Add eggs, 1 at a time, beating well after each addition. Gradually beat in flour, spices, pumpkin and maple syrup. Pour batter over crust.

Bake for 1 1/2 to 1 3/4 hours, or until filling is set. Cool for an hour and refrigerate for several hours. Don't worry if the top cracks, apparently that's okay and it still tastes great.

Garnish with freshly whipped cream and a sprinkle of cinnamon.

This was a huge hit, as was Stewart's apple pie. All in all, a great night for desserts!

Thursday, September 23, 2010

Garlic Zoom

Okay, so I'd seen these things before and didn't really know what to expect. And then at the cooking shower this summer I was given one, and told by that it really does work. And I tell you, people aren't lying, these things are awesome. You seriously just put your garlic bulb in the little space and roll the Garlic Zoom across the counter (really you need to make car noises when you do this). It chops the garlic so nicely, plus it's fun!

Wednesday, September 22, 2010

Mushroom Chowder

Well, yesterday marked the official last day of summer, but you know what, I think I'm okay with that. I like the fall, wearing sweaters, drinking tea and cooking all of those great wintery comfort foods.

I had all these mushrooms in my fridge, in plastic, and no brown bags in site. Knowing that they wouldn't last, I decided to make a mushroom soup for dinner. I adapted this recipe to use what I had on hand, and it was great, that night, and for lunch for a couple of days too.

Mushroom Chowder (adapted from The Best of Bridge)
- 2 tbsp vegetable oil
- 1 clove garlic, minced
- 1/2 cup sliced onions
- 1/2 cup diced carrots
- 3 cups chopped mushrooms (I used portobello's, crimini and white mushrooms)
- 3 cups vegetable broth
- 2 cups light cream
- 1/2 cup diced potatoes
- 1/4 cup frozen corn niblets
- 1/2 apple, peeled & diced
- 2 bay leaves
- 3 tbsp red wine
- 2 tbsp chopped parsley

It looks like a lot of ingredients, but it is surprisingly quick and easy to make, just prep all the ingredients before hand and it's a breeze.

In large saucepan or dutch oven, heat oil and saute garlic, onions, carrots and mushrooms for about 5-8 minutes, being careful not to brown.

Add broth and cream to vegetable mixture. Bring to a boil and reduce heat to simmer. Add potatoes, corn, apple, bay leaves, wine and parsley to soup. Simmer about 1/2 hour. Remove bay leaves, season and serve.

Monday, September 6, 2010

Slow Cooker Ribs

It was a rainy Labour Day here in Vancouver, and I was glad I didn't have anything to do. It was also the perfect day for a nice slow-cooked rib meal. I've made ribs lots of different ways, but one of my favourites is done in the slow-cooker with a quick barbecue sauce. This recipe is adapted from Canadian Living, and lives up to it's name 'Fall-off-the Bone Ribs'.

Slow Cooker Ribs
- 2 racks pork back ribs
- 2 tsp chili powder
- 1 tsp cayenne pepper
- 1/2 tsp each salt and pepper

Sauce
- 2 cups ketchup
- 1/2 cup wine vinegar
- 2 tbsp granulated sugar
- 2 tbsp Worcestershire sauce
- 1 tsp liquid smoke

Trim fat from ribs and cut into 2-3 rib portions. In small bowl stir together chili powder, cayenne and salt and pepper. I also added some seasoning I bought in Hawaii this time. Rub all over ribs. Place on pan and broil until browned, about 5 minutes each side. Transfer to slow cooker.

In bowl, whisk together all ingredients for sauce. Pour over ribs, scraping sauce from bowl. Stir to coat.

Cover and cook on low until tender, and falling off the bone, about 6 hours.

I usually use baby back ribs, but used spare ribs this time, and they were just as good!!!

Thursday, September 2, 2010

Eggs Benedict

I'm a huge fan of Eggs Benny, and I used to eat it almost every weekend. I'm less indulgent now, and save it for special occasions. A brunch at the cottage with my dad was such an occasion. This was the last morning at the cottage before heading into the Soo to start the intensive wedding preparations, so we decided to embark on this adventure. Now, neither of us had ever attempted to make Eggs Benedict, much less even poach an egg. This resulted in numerous phone calls to my mom, and numerous eggs undercooked before we got it right. Dad was in charge of the eggs, and I did the Hollandaise Sauce. Together we made a great meal, although the kitchen was a huge mess!!! I think we ended up going through a dozen eggs by the end of.

Hollandaise Sauce (from Canadian Living)
- 4 egg yolks
- 1/4 cup water
- 1/4 tsp pepper
- 1/4 cup butter, softened
- 2 tsp lemon juice

In small heavy saucepan, whisk together egg yolks, water and pepper; cook, whisking, over medium-low heat for about 5 minutes or until pale and thick enough to coat back of spoon. Remove from heat. Whisk in butter and lemon juice.

I decided to use a double boiler, because I really didn't want to end up scrambling the eggs... it ended up taking a little bit longer, but it still worked.

Toast your english muffins. We used peameal bacon, so good, so cook that as well. Top english muffins with peameal, then poached eggs, then hollandaise sauce. Sprinkle with fresh chives.


Poaching eggs: I'm not going to pretend I know how to do this. We were using an egg poacher, and we both decided afterwards that it's probably better to just poach them in water. I am still going to be figuring out how to poach eggs, and will let you know what I come up with.

It was a fantastic meal, but all in all, for the trouble and the mess, I think I'll save Eggs Benedict for restaurants, and keep pancakes for brunch!

Thanks for the great kitchen experience Dad!

Reebs


Friday, August 20, 2010

I'm on Twitter

Hey,

I've added a new function to the Blog. I'm now a Twitterer, or whatever the term is. Anyways, follow me on Twitter, you can just click on the link on the upper right hand corner. I'll be tweeting from my favourite restaurants, market place and anything else that I think you'll enjoy.

Reebs

It's been a long time...

Hello everyone,

My sincere apologies for taking so much time off this summer, but it was for a very good cause. I went and got hitched! It was a lot of fun, and of course we were inundated with fabulous gifts, many of them kitchen oriented, which I will have to try out and blog about.

There was a fabulous shower held in my honour, and the guests contributed money so that Brent and I can take a culinary course here in Vancouver, which we are very excited about. Guests also brought their favourite kitchen gadgets, and boy did we get a lot of great stuff.

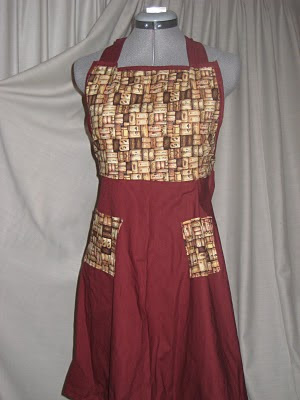
One of my favourites though, would have to be this apron from my mom, although I'm not sure how funny Brent finds it.
We had a great time back in Ontario, spent a lot of time with family and friends, and a lot of time out at Big Basswood, where my dad and I successfully (and messily) made Eggs Benedict together for the first time. That post will come later as well.

Thanks for waiting, many more posts to come!!!

Rebecca

Saturday, June 26, 2010

Market Find - Kohlrabi

Went to the Market this morning and this is what we bought for the first time ever:

It's called a Kohlrabi, and apparently can be eaten raw or cooked, similar to a carrot. The leaves can be sauteed or can be used as a wrap. I'm not yet sure what we'll do with it, this may require some online research.

I will keep everyone posted!

Monday, June 21, 2010

Garlic Scapes

As I mentioned in my last post, I picked up some garlic scapes at the market on Saturday.I wasn't really sure what I was going to do with them, and read around on the internet to see what people suggested. Two of the main suggestions were pesto and also sauteing them in butter. I didn't really feel like making pesto, but did like the idea of having pasta. Plus I had all of those heirloom tomatoes staring at me from the counter.

Before starting the recipe I decided I had to try a piece of garlic scape raw, just so I had an idea of what it was before I started cooking with it. It was very strong, almost instant heartburn. But, I knew from that small sample that once it was cooked down it would have a great flavour.

Pasta with Garlic Scapes and Heirloom Tomatoes
~ 8 garlic scapes, sliced into 1/4 inch pieces
~ 1/4 red onion, sliced
~ 1 tbsp each butter and olive oil
~ variety of tomatoes, chopped
~ 1/2 cup feta cheese
~ salt & pepper
~ pasta, your choice

Heat pan over medium heat, melt butter and add olive oil. Saute garlic scapes and onion in butter and oil until they begin to soften, about 5 minutes. Season with salt and pepper. Add tomatoes, simmer for 15-20 minutes, until tomatoes have broken down. Season with salt and pepper.

At this point you can choose to serve, or as I did, you can add a bit of creaminess. Stir in 1/2 cup of feta cheese. If you choose to use feta, keep in mind that you won't need as much salt when you are seasoning.

In the meantime, cook pasta according to directions. Mix with sauce. Serve topped with Parmesan cheese, and garnish with a cherry tomato.

Very yummy!!! (and quite garlicky, in a good way)

Sunday, June 20, 2010

Market Finds

We had a pretty stellar time at the West End Farmers Market this weekend. Started off by finding the English Peas and buying a bunch (I missed them last week). Then it was off to have some fresh Ham & Cheese Crepes before purchasing the rest of our weekly fruit and veggie run. This week we picked up fresh strawberries and raspberries, salad greens, chard, a bunch of different heirloom tomatoes, olives, tuna and baby back ribs and bacon. I'd say we did pretty well.
Doesn't it all look so good? Now to just find interesting ways to prepare it all. Oh, and the ingredient we bought this week that we've never had before were Garlic Scapes, we'll see how it goes!

Friday, June 18, 2010

Stuffed Portobello Mushrooms

It's finally starting to feel like summer, with the sun shining and the summer markets in full swing. This year, we made a pledge to try and purchase one thing each week at the market that we had never cooked before. So last week rather than go for the crimini mushrooms I usually get, I grabbed a couple of Portobello's. This recipe is what I came up with to cook them, and I think it's a keeper.

Reebs' Stuffed Portobello Mushrooms
- 2 Portobello Mushrooms
- 2 shallots
- 3/4 cup quinoa, rinsed and drained
- 1 1/2 cups vegetable broth
- 6-8 cherry tomatoes, chopped
- 1-2 cloves garlic, chopped
- bunch of spinach and/or kale, chopped
- feta cheese

First off, prepare the quinoa. I prepared mine using a recipe for Quinoa with Shallots from my new Mark Bittman cookbook.

1 - Heat two tbsp's olive oil in a skillet with lid over medium-high heat. When hot, add shallots, sprinkle with salt and pepper, and cook, stirring occasionally about 3 minutes.
2 - Add the quinoa and stir; when grains start popping and toasting, add stock and bring to a boil. Stir one last time, cover and reduce heat to low. Cook undisturbed for 15 minutes.
3 - Uncover and test for doneness. If the kernels are still hard, make sure there's enough liquid to cover bottom of the pan, cover and cook another 5 minutes.

Once that was done, I put it aside and started working on the rest of the filling. First off, prepare the mushrooms. I wipe mine down with a damp paper towel, that way they don't get too wet. Remove the stems and chop for the filling. I scraped the gills out, this is totally a personal preference, really I just wanted to make more room for the filling.

For the Filling:
Heat a tbsp of olive oil in pan, sautee garlic, mushroom stems, and tomatoes until they start to soften. Add greens and continue to cook until greens are wilted. Stir in enough quinoa to make enough filling for the portobello's. Season with salt and pepper. Spoon filling over portobello's, making a large mound on each mushroom. Sprinkle with feta cheese.

Bake in 350 F oven for 20-25 minutes, until feta is starting to brown.

Serve with a light salad.

Tuesday, June 15, 2010

Special Delivery

So I got home from this photography workshop I'm doing and my landlord had a package for me.
I was so excited to see it was from Amazon, because I had just purchased a few things online in the past week or so, and the best thing was in the box.

Mark Bittman's 'How to Cook Everything: 2000 Simple Recipes for Great Food'.


I was at a friends place on Friday and was flipping through his copy. I loved it so much I actually ordered it from my phone. I never thought it would come so soon!

I hope to be posting many new recipes from this cookbook in the coming weeks.


Thursday, June 10, 2010

Tofu with Peanut Sauce

Even though apparently summer doesn't seem to want to arrive in Vancouver, I'm still trying, and grilling indoors since it's too wet and miserable out. I'm also trying to find new ways to cook with tofu, it's affordable, a great source of protein and can be quite good if well prepared. With tofu, it's really all about the marinade as tofu really absorbs the taste of whatever it is cooked in. This recipe is from Canadian Living, a great source for simple yet delicious recipes that are easy to adapt based on what is in your pantry/fridge.

The peanut sauce from this recipe is fantastic, and would be great with chicken as well!!!

Tofu & Vegetable Skewers with Peanut Sauce
- 1 pkg extra-firm tofu
- 2 cups sugar snap peas
- 2 cups cherry tomatoes
- 2 cups small mushrooms
- 2 tbsp extra virgin olive oil
- salt and pepper

Peanut Sauce
1/2 cup smooth all natural peanut butter
1/2 cup warm water
1/4 cup tamari
2 tbsp ketchup
2 tbsp lemon juice (juice of half a lemon)
2 cloves garlic, minced

To make the peanut sauce, whisk together all ingredients until smooth. Remove 3/4 cup and set aside.

Rinse and pat tofu dry. Cut into 24 equal pieces that can thread onto skewers. Add to peanut sauce in bowl, toss gently to coat and let stand for 10 minutes. Thread onto skewers.

In separate bowl, toss together vegetables with oil and salt and pepper. Thread vegetables onto skewers.

Place skewers on greased grill over medium-high heat. Grill, turning once, until tofu is browned and vegetables are tender-crips, about 10 minutes.

Serve drizzled with more peanut sauce, over rice.


Saturday, May 8, 2010

Homemade Pizza

Growing up in Sault Ste. Marie, we had great pizza anytime you wanted. It was always from local restaurants, no chain pizza shops ever lasted very long. When I first moved out, to Ottawa, I remember the desperation my roommate and I (also from the Soo) felt when we were craving good pizza. It always took awhile, but eventually I would find a good pizza restaurant, only in time to move to the next city. In Ottawa, it was Fida's. I don't know if that place is still around, but on most days if you went to pick it up it was 50% off, awesome for University students, and damn good pizza too! When I moved to Montreal I ended up working at one of the best pizza places (and I'm not being biased) - Amelio's - where you have to try the Blanche (or four cheese).

Vancouver has been hit or miss with pizza. We'll find a decent pizza joint, but consistency is hard to come by. Incendio's is definitely on our list, however we find more and more that we prefer to make pizza at home. I used to use the recipe found here , and thought it was the bomb. It is great if you are making pizza and are tight on time. However, my sister recently introduced to me the beauty of a pizza dough that you let rise. You can either let this one rise for an hour and cook right away, or overnight. This dough is the bomb!

Pizza Dough (from The Complete Canadian Living Baking Book)
- 3 cups all-purpose flour (approx)
- 2 tsp quick-rising (instant) dry yeast
- 1 tsp salt
- 1 1/4 cup hot water
- 1 tbsp extra-virgin olive oil

In bowl, combine 2 3/4 cups of the flour, yeast and salt. With wooden spoon, gradually stir in water and oil until ragged dough forms, using hands if necessary.
Turn out dough onto lightly floured surface; knead, adding as much of the remaining flour, 1 tbsp at a time, as necessary to prevent sticking, until smooth and elastic, about 8 minutes. You can use a stand-mixer for this, cutting the kneading time in half. Place in greased bowl, turning to grease all over; cover with plastic wrap.

If you want to have the pizza today, let rise in warm draft free place until doubled, about 1 hour. If you want to have the pizza tomorrow or another time, let rise in refrigerator for 1 day. You can freeze in large resealable freezer bag for up to 1 month; let thaw and rise in refrigerator overnight.

When you are ready to make your pizza, roll the dough out to fit whatever size pan you are planning on using. I used a cookie sheet for mine. Grease the pan lightly, then place the pizza dough on it. It should feel quite flexible. Crimp the edges to create a bit of a crust. Top and then bake in bottom third of 450 F oven for 20 - 25 minutes.

While I love the quickness of the other pizza dough, I would really recommend trying this one if you have the time. It is so good, crusty on the outside and soft on the inside. I topped mine with artichoke hearts, tomatoes, green olives, mushrooms, spinach, zucchini and feta and mozzarella cheeses. So yummy!!!!

Sunday, April 11, 2010

Chicken in Phyllo Pastry

The first time I made this recipe was in University, when I was having some new friends over for dinner. I can't remember for the life of me why I decided on this particular dish, but when at dinner the girls were asking where I bought the chicken bundles from, I knew I had found a new favourite. Since that day back in 2001 I have made this numerous times for many different people. I've privately dubbed it my best 'dish to impress'. That is, if I'm cooking for people for the first time, I know this dish will is a crowd pleaser. So when I was visiting my sister in Toronto and she told me we were having some of her friends for dinner, who were looking forward to having me cook for them (I think she may have talked me up a bit) I thought, why not pull out ole faithful. It was a hit!

Chicken in Phyllo
- 8 Phyllo Pastry Sheets, thawed overnight in refrigerator
- 1/4 cup (or more) butter, melted
- 4 boneless, skinless chicken breasts, halved
- 1 bunch of fresh spinach leaves, stems removed
- 1 bunch fresh basil leaves, chopped
- 1 large red pepper, cut in strips
- 3/4 cup feta cheese, crumbled


One of the biggest things with making this dish, is the prep. After years of prepping this, my best advice is to have everything ready in an assembly line type operation. Phyllo is not difficult to work with, as long as you take care of it. What I mean by that is to cover the phyllo you are not using with a damp cloth. This helps it to not dry out and crack, making your life much easier. Once you have each of the items prepped and set out, it's time to get started.

Lay one sheet of phyllo on counter and fold in half. Brush melted butter along edges. Place chicken breast half in the middle, near the bottom of phyllo. Layer spinach, a sprinkling of basil, red pepper strips and some feta cheese. Roll chicken and phyllo over once. Fold edges toward the middle and continue rolling until you've formed a nice little bundle.


Place on cookie sheet, brush with butter. Now the next key is to cover this with another damp cloth, covering each bundle as you work. Once this is completed, you can either cook right away, or wrap in plastic wrap and refrigerate overnight.

Bake in middle rack of 375 F oven for 25-30 minutes.

This dish is from The Best of Bridge, one of the best cookbooks you should have. It is great served with the Chickpea Couscous.

Thursday, April 1, 2010

Chicken and Brie Panini

The panini press is a fantastic thing. Luckily for us our panini press is part of our indoor grill. If you're in the market to purchase an indoor grill, I would highly recommend you get one that comes with a panini press. The options are endless when you can whip up a quick grilled sandwich, such as the one we had for dinner last week.

Grilled Chicken and Brie Panini
- loaf of crusty bread (if you're unsure, ask at the bakery what would work well in a press)
- boneless, skinless chicken breast
- 1 pear, sliced
- Brie cheese, sliced
- Sweet jam (I used a maple and walnut spread)

Cook chicken however you please. I simply rubbed some olive oil, salt and pepper on mine and baked in 350 oven for about 20 minutes.

Slice bread in good sized sandwich portions, and then cut in half. Spread bottom half with sweet jam. Layer pears, chicken and brie, top with other piece of bread. Place in panini press and cook until cheese is nice and melted.


A trick we've picked up from watching panini's made at cafe's is to use parchment paper on both sides of the grill, so you don't end up with a sticky gooey cheesy mess to clean up.

Thursday, March 25, 2010

Chickpea Couscous

After watching that first episode of Jamie Oliver's Food Revolution, I wanted to make something healthy and wholesome for dinner. Looking through the cupboards and fridge, I realized I had enough to make a variation of a couscous dish from the Best of Bridge that I've made numerous times before.

Chickpea Couscous
- 1/2 red onion, chopped
- 1 large red pepper, chopped
- 1 clove garlic, chopped
- 1/2 tsp paprika
- 1/4 tsp cayenne pepper
- 2 carrots, chopped
- 1 cup frozen green peas
- 1 can chickpeas, drained and rinsed
- 2 tomatoes, chopped
- 2 cups liquid (ideally broth, I used water)
- 1 cup couscous
- can of artichoke hearts, chopped
- 3 tbsp freshly chopped parsley
- juice of half a lemon

In saucepan with tight fitting lid, heat 1 tbsp olive oil over medium heat. Saute onion and red pepper until they begin to soften, about 2-5 minutes.. Stir in cayenne pepper, paprika and garlic. Cook one minute. Add carrots, chickpea's, green peas, tomatoes and liquid. Cover and simmer for 5 minutes. Add couscous, cover and simmer for one minute more. Remove from heat and keep covered for 5 minutes. Stir in artichoke hearts, parsley and lemon.


Tuesday, March 23, 2010

Jamie Oliver's Food Revolution

I just finished watching the first episode of Jamie Oliver's Food Revolution. It can be found here on CTV's media player.

I'm a big fan of Jamie Oliver and some of the stuff that he has done in England to help people understand and care more about their food. I'm anxious to see how he does with the North American version of this show. It seems to be a bit of a mix between meeting up with families, going to community groups, and of course helping out the school system. It really does blow my mind that kids are being fed such horrible food on a daily basis. For adults to be eating this stuff is one thing, but kids are not given a fighting chance when they are having pizza, chicken nuggets, french fries and white bread as their staple diet. This is the kind of thing that makes me so passionate about bringing food and cooking back to the house, and bringing people together around the kitchen table.

I was lucky growing up in a family where having dinner together meant something, and helping out in the kitchen was an every day occurrence, and not just for special occasions. I try every day to remember how lucky we are to live in a city and a country where we can access good healthy food, and where we have the time (and it doesn't take a lot of time) to make healthy meals every day. I'm not saying that I'm perfect, and by no means is that the case. I love going out to eat, and when I'm at the movies, you'll find me with some popcorn. Rather, it's a matter of making the right choices, and not seeing meal time as an inconvenience, but rather a time to come together and sit down for a few minutes, uninterrupted. When I was growing up, and the phone rang at dinner time, you didn't get up from the table to take the call. Whoever answered the phone took a message, because dinner time was family time (plus who wants their food to get cold!).

I guess that first episode of that show got me kind of riled up. Change is a difficult thing to provoke, and Jamie Oliver has his work cut out for him. I admit that I shed a tear or two watching it, and thinking of all those kids who are already so unhealthy at such a young age. But, at the same time there's a feeling of hope, that a real food revolution is upon us. We will move away from the fast food coma we as a nation (Canada is just as bad as the US) have been in, and start to appreciate home cooked food again.

I'm doing my part everyday, and I hope you are too!

Monday, March 22, 2010

Broccoli and Asparagus Soup

I saved the stalks from the broccoli I used for last night's casserole so I could make some soup for dinner tonight. On the way home I picked up some asparagus and had enough stuff at home to put something together quickly. There's really not a lot to the soup, so it's easy enough to make after work.

Broccoli and Asparagus Soup
- 4 cups broccoli florets and stems, chopped
- 4 cups of chopped asparagus spears
- 1 onion, chopped
- 4-5 cups of liquid (I used part veggie stock, part
water)
- 1 1/2 - 2 cups of milk

In medium saucepan, over medium heat, melt 2 tbsp butter and a tbsp of olive oil, saute onion for 5 minutes, until softened. Lower heat if needed. Add broccoli and asparagus, season with a bit of sea salt and pepper. Cook for 5-10 minutes until vegetables are tender. Add veggie stock and water. Simmer, uncovered for 20 - 25 minutes.

Transfer soup to a large bowl. Blend soup in batches, returning to saucepan. Over medium-low heat, stir in milk, simmer for 5 minutes. Season to taste.

Of course, this soup begs to be enjoyed with a grilled cheese sandwich. Pick up some fresh bread for the sandwiches, it makes a huge difference!

Sunday, March 21, 2010

Sunday Night Dinner - Chicken and Broccoli Casserole

We spent the weekend in Whistler for my staff post-Games celebration. It was a lot of fun, lots to celebrate, and skiing was phenomenal. Arriving back, I was exhausted and just wanted some comfort food for dinner, and something that would be very easy to make so I could have a nap. Remembering a casserole we used to have as kids, I thought I would try my hand at it. I had asked my mom for the recipe a few years ago, and luckily had saved the email! My sister's and I loved this dish, until one of my sister's went downstairs while my mom was preparing it and saw that it included cream of mushroom soup. So funny how kids will love something until they know what's in it. This recipe originally comes from my godmother, and has been adapted because I didn't read the entire recipe before I started (again, I was really tired and do not recommend that).

Mom's Chicken and Broccoli Recipe
- 4 - 6 boneless skinless chicken breasts
- 4 - 6 cups chopped broccoli florets
- 3 cups (approx) shredded cheddar cheese
- 2 cans of cream of mushroom soup
- 1/2 cup of vegetable broth
- 2 tbsp melted butter
- 1/2 cup fine bread crumbs

In greased casserole dish, place broccoli florets. Cut chicken into a bit larger than bite size pieces. In cast iron pan, cook chicken on medium until no longer pink inside, about 6-10 minutes, depending on the size of the chicken pieces. Place on top of broccoli.

Cover with shredded cheese. In bowl, mix mushroom soup with vegetable broth, pour over entire dish. Top with mixture of melted butter and bread crumbs. Bake in 350 oven for 35 minutes.

I served this over rice, and it was really good, and I have a feeling it will taste even better for lunch tomorrow.

Sunday, March 14, 2010

Where has Reebs been...

Hey everyone,
I know it's a been a long time, this is actually my first post in 2010! It's been a very busy couple of months though. I was working on the Olympic Winter Games, which didn't leave much time for cooking or blogging. Prior to that I was busy trying my hand at making aprons, for friends and family for Christmas.

Keep your eyes on the blog, as there will be some changes coming, including some new features, and maybe even some more aprons, oven mitts and other fun kitchen stuff.

Now that things have quieted down a little, I'm looking forward to having time to cook, sew, eat out and enjoy all the things I love doing.

Reebs